Step By Step Guide To Shooting Product Photography
Today, we're going to be taking a walk through easy product shoot. This kind of photography is in some call for on inventory photography web sites and is perfect for showcasing an item so that you can promote it on Ebay or Etsy. As pronounced our current nonetheless lifestyles article, once you have mastered this sort of pictures, it is able to be in my view profitable and pay very well.
The most fundamental form of product photography is an object in front of a white or solid colored seamless history. that is regularly utilized in retail catalogs once they want to display their merchandise without distractions. these are from time to time referred to as cutouts as it’s clean to reduce out and insert into another image.
Many photographers can efficiently shoot product pics at home with little hassle. ideally, you will have as a minimum three or four lighting to work with, but it is viable to do it with simply . We’ll explore that during this tutorial.
You'll need
- at least right light sources, more the higher
- A 18% gray card (elective)
- A smooth, bright white poster paper or comparable
- A light field (optionally available)
- Translucent paper – white tissue paper, tracing paper, wax paper, or white umbrellas
- A desk or work space
- picture editing program inclusive of Photoshop, Lightroom or Gimp
lighting fixtures, digicam... movement
For this tutorial, i use simplest a couple of flashes. at the same time as I could, as I describe beneath, use lamps or different light assets, I opt for my flashes because they're easy to reposition and are fairly effective.
if you don’t have flashes or speedlights, incandescent lightbulbs, florescent bulbs or tubes, anything you have got on hand, are all suitable. If feasible, buy some of equal-emblem, identical wattage bulbs. The bulbs’ colorations can vary from logo to emblem, and whilst your eyes won't discover the slight distinction, your digicam can. Lamps, mainly the type with bendy palms, are incredible for this sort of product images.
there may be some other mild choice: sunlight hours. preferably a pleasant, overcast day. but, sunlight hours’s depth may be unpredictable, relying at the climate and the time of the day. relying on sunlight hours isn’t always viable, and if you’re constrained to shooting in evenings when it gets darkish early. that is wherein synthetic light comes in handy - it is a regular, constant light source that come up with the self assurance that the light ranges will not alternate from one second to the subsequent.
Whichever light source you choose, use multiples of the equal light sources is because it can be tough to catch up on mixed lights. as an example, florescent bulbs generally tend to emit inexperienced- or orange-tinted light. most incandescents forged a yellowish hue. And tungsten is orange.
while it is viable to make amends for the combined tint in-digicam or in the put up-processing, it's far less complicated, specially in case you’re simply beginning to explore this style of images, to use a steady mild supply because it’s one much less step to futz with. take into account to apply a guide white balance placing this is appropriate to your mild source.
gray Card
A 18% grey card may be very accessible for great-tuning the white balance, in particular vital while you’re photographing some thing with a white history. coloration casts out of your lights or maybe the light reflecting off your object can be apparent at the white backdrop.some newer dSLRs have a customizable WB setting. If yours does, picture the cardboard and it will help you determine the proper white balance. For further information on how, test your camera’s guide.
if your digital camera does not have customizable WB placing, you can still use this card to determine and regulate the white stability in post-processing.
Your digicam doesn’t have this custom characteristic otherwise you lack a 18% gray card? after you’ve set your desk up, set the WB to whichever light mode you’re using, take a few pictures of the white poster paper and great-tune the WB the first-rate you can.
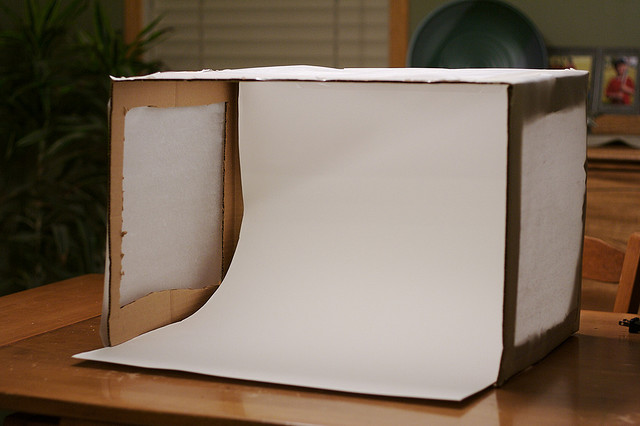
The Set-up
There are a number of specific approaches you could set up your desk. you should purchase one or make your personal DIY lightbox.
Photograph by D'Arcy Norman
On the other hand go the apathetic course and tape your paper publication up to a divider.
Getting the Lights Right
Notwithstanding lighting is imperative. One of the primary prerequisites of this kind of item photography is that it's anything but difficult to remove the article; and keeping in mind the end goal to do as such, it's critical that the diagrams of the item are fresh and clear and the shadow on the background is negligible.
The Object Du Jour
For this instructional exercise, I have picked a toy that is not intelligent (we'll investigate intelligent articles some other time). I suspended the toy on strings for a couple reasons. In the first place, in view of the predetermined number of light sources accessible, this will minimize the shadow underneath it. Second, the background wasn't sufficiently substantial for this item. At the point when the toy was on the "ground," the edge of the setting crossed with its feet. While that wasn't a gigantic issue – it's effectively altered in photoshop, unquestionably – I like to depend on post-preparing as meager as would be prudent. The strings are all the more effectively cloned out and it will be less dangerous to the picture quality to repair in the post-process stage.
Single Light
With stand out light put at around three o'clock (with the mythical beast in focal point of the clock), it throws excessively solid of a shadow. It has no effect how I put it; there is a fresh shadow.

when I place an umbrella in among the flash and the toy, it enables melt the shadow. but, both the body of this toy and the lft facet of the backdrop are in shadow, it needs a few light from the left facet.

Two lighting fixtures
that is with out a umbrellas to diffuse the mild; the right light continues to be at three o'clock, the left at about 8 o'clock, and now we have two harsh shadows. Unacceptable.
With umbrellas – better. depending on your intention in this mission, this is probably proper enough. I feel this may be similarly progressed upon, however.

Repositioning lighting

I moved the left mild so it’s barely above and left of the object. The right mild has been repositioned it so it is aimed more downward, on the floor underneath the toy; the white surface bounces a few light again up underneath the toy. I also added a small white reflector on the left just behind the toy, without delay contrary the proper flash; this bounces a few fill mild onto the rear of the toy. (note for the DIY-ers: A white poster paper or wall can be used to similar impact.)
The lighting is now greater even during. it's not best, but a great deal higher.
The shadow is sort of long gone and if I so choice, i'm able to keep away from it out effortlessly with out affecting the best an excessive amount of in the publish-processing level. Having performed with some different positions (not proven) of the lighting, I’ve conceded that that is the best placement for this object. If this toy turned into reflective, but, I’d pick a distinctive association and update the umbrellas with sheets of translucent paper.
more than one lights
As stated before, a couple of lighting fixtures is right. As you can see in all the pictures, the backdrop is not stark white - that is in part due to the paper itself, and in element due to the fact I don't have a 3rd mild entirely for illuminating the backdrop. it is now not the quit of the sector in case you're inside the same boat, though; i have offered pix that have been lit by best lighting simply best.
If I had the option, i might vicinity a 3rd mild above, with barn doorways to govern the light unfold, aimed toward the backdrop for a brighter white historical past. And perhaps a fourth to decrease the shadow under the toy even further. if you have get admission to to multiple lighting fixtures, i'm hoping this description enables you find a good setup.
selecting the Aperture
in case you’re photographing an item with the purpose of selling it to a inventory organisation as a cutout, you can need near down your aperture as a way to keep a crisp define of the item.

Inside the above example, which become shot at f4, this is unusable. This toy is already fuzzy as is and probably too hard for a photo designer to reduce out smartly.

At f8, it’s passable

At f18, it’s a great deal better. the rims are still tender, but it really is more because of the character of the toy itself.
this is still life; a fast shutter speed isn’t necessary. decrease it as a great deal as you want to a good way to get an excellent publicity, and use a remote or the self timer to keep away from digital camera shake. Do take word that, at this aperture, the background’s inherent flaws - as an example, creases within the paper backdrop - might also stand out too much. in case you're doing this for a laugh or to promote an object of yours, the DOF isn't that vital. select an aperture that appeals to you the pleasant.
in the long run, I went with this placing: f18, ISO 200, shutter velocity 1/thirtieth of a 2nd.
final picture
Now i have chosen my final photo, all I should do is clone out the strings and supply the photograph a slight raise to the saturation (due to the fact Pentax's dSLR cameras are set to desaturate the pictures in-digicam, a acknowledged difficulty for all the okay line cameras). Voila.

Now I should provide the toy back to my dog!
Very last hints
- marketing-clever: consider leaving some area on either above, left or proper; advert corporations, magazines and different consumers of stock pics like room for text.
- Staging is vital. easy some thing object you’re photographing – dusty or grimy objects aren’t in particular appealing. inside the dragon's case, I tossed it in the wash earlier than photographing it.
Labels: Commercial Product, Commercial Product Photography, Commercial Product Photography Tips, Commercial Product Photography Tuorial, Product Photography, Product Photography.
posted by Md Enamul Hoq @ 7:02 AM
0 Comments
![]()


0 Comments:
Post a Comment
Subscribe to Post Comments [Atom]
<< Home